
It’s a week until Thanksgiving, 5 weeks until Christmas, and 7.5 weeks until my due date… I’m so thankful for my new baby boy on the way, and I’m very thankful to have a lot of preparations ready so that I can enjoy some relaxing holiday time with family!
When choosing material to make curtains for the new baby boy room, I spotted some really cute whale fabric that I didn’t want as curtains but thought they would make precious bedding for our little boy’s “Old Man & the Sea” room, so I committed to attempting a fitted crib sheet by buying 1 1/2 yards of the material…never having made a fitted crib sheet before or knowing how much fabric was required. Getting home and making time for this new project, I followed directions from a book, Sew & Go Baby, by Jasmine Hubble and from PrudentBaby, both of which direct you to use 68 inches of typical fabric (43-45″ wide), which is almost 2 yards. Fortunately, I had extra curtain fabric that I used to patch together a long enough piece of material for making my fitted sheet project…just took a little extra time.
Supplies: 2 yards of fabric (or 68″ technically), 2 yards of elastic (1/2 to 3/4″ wide), 2 safety pins, scissors, thread, & sewing machine
I was so proud of myself after I finished this project, that I immediately went out and found some more crib sheet material and made a second one, which took very little time – I finished it across one day’s naptime and maybe half an hour in the evening. So, two have now been made and the step-by-step photos are from both projects, and that’s why the material switches around…sorry!
1. First (after pre-washing and drying your fabric), lay out your 68″ of fabric and cut 8″ by 8″ squares from each corner. (I doubled mine up to cut two at a time on my second sheet).

2. Next, pin right sides together of each cut-out and sew. Make sure that the edges are lining up straight – the straight sides of the fabric.

Now, you have a somewhat shaped mattress cover that needs to be “elasticized” to stay on the crib mattress.
(disclaimer:I followed my own version of doing this, straying from either of the directions I was following, simply because I stuck with what I already knew – how to string elastic through the tops of kid or pajama pants – so I don’t know if this is the easiest way for everyone. Check out the other blog link from above if you aren’t comfortable with this way of doing it -from PrudentBaby.)
3. For my way, you now need to pin and sew a exaggerated hem, so fold down fabric along all four sides about 1.5″ and fold that piece over about another 1/4″ to pin and sew, BUT LEAVE about 2″ open/unsewn for inserting string of elastic. This is just like sewing down the top of a curtain where you want to string in the rod, but this time we’ll be stringing in elastic.
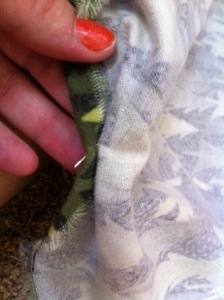

4. Use safety pin to attach one end of elastic to outside of opening to large hem. Now, attach second safety pin to opposite end of elastic for pulling through the entire length of the hem, unbunching fabric and pulling it back along elastic strand as you go, until you come out at the other side of the opening. Thus, the elastic reaches the entire length of hemmed bottom of crib sheet. (Hopefully these photos help!) I like working on this step while watching a show or multi-tasking in some way 🙂


5. Last step – pull the elastic ends out enough to easily sew together, overlapping the ends a bit, on the machine, using a zig-zag stitch, preferably. Now, you can sew up the final part of the “hem” to close off the elastic-filled, hemmed bottom of the fitted crib sheet. I stretched mine around a bit to evenly distribute fabric around the elastic before putting it on the crib mattress.

Here’s my final products! (Although I’m thinking of adding some embroidery by hand to the whale sheet…)


Your instructions are very professional!
Wow, thanks! 🙂